BlueBox ERP has a number of types which can be applied to any location:
Finished Goods Node: Defaults the "Finish At" location to the nearest Finished Goods node on works orders. Used as a pack to location when adding stock (GRN/WO Builds) if none set and the item has no default stock location. Also used as the default "From Location" on bb_sales_point_of_sale_tillslips and bb_sales_orders when allocating stock if there's no from/despatch location already set.
Despatch Node: Defaults the "Despatch From" to the nearest Despatch Node on sales orders.
Jobbing Node: Defaults the "Return To" location on inventory returns
Non Sales Node: Stops users from creating Sales documents within flagged locations. Also stops users from selecting flagged locations from within sales modules (ie. any To/From location selections) [NOTE: This is a recent change. before it blocked all non-sales locations on all docs]. Finally, it will also exclude flagged locations when checking for available stock when the To Document is not bb_manufacturing_works_orders/bb_inventory_pick_pack_slips (so applies to all other documents).
Non Transfer In Node: The "Deliver To" location cannot be a non-transfer in node on GRNs. It also excludes/blocks non-transfer in nodes in the "To Location" on Internal Transfer Notes/Pick Pack Slips.
Isolation Node: Stops these locations from being used as the source in auto-allocation of stock. However, it will not block stock requests if the primary from location is an isolation node (allowing stock to be manually moved into and out of isolation areas).
Exclude From Pick Slips: Stops these locations from being used in the "From Location" when generating a pick slip.
Write Off Node: Stock transfered into locations with this flag are automatically set to the Written Off status.
Wednesday, August 26, 2015
Wednesday, July 8, 2015
Sales Rep Filtering in Sales Orders and Quotes
BlueBox offers filtering restrictions for Sales Representatives/users in the system.
A Sales Rep. is assigned to a Sales Order or Quote automatically based on the user who creates the document. This can be set manually too, at the time of creation or on editing the document.
There are 3 main status types when it comes to restricting who can see Sales Orders or Quotes assigned to other Sales Reps:
- If the user has 'admin' permissions for bb_sales_orders or bb_sales_quotes then they will be abloe to see (and filter) by all sales reps. There is also a bbsetting which allows this ability to be assigned no matter what the permissions of the user are:
bb_sales - bbsetting_skip_sales_rep_filtering_on_pre_pipeline or
bb_sales - bbsetting_skip_sales_rep_filtering_on_post_pipeline - If the user is not an 'admin' user for the module, then, by default the user will only be able to see their documents (ie where their user is set as the Sales Rep.)
- Lastly, there is a setting which allows users to filter by their user for Sales Rep only - but can also search all Sales Orders by the other filter fields which are available:
bb_sales - bbsetting_sales_rep_filtering_on_pre_pipeline_for_all_or_self or
bb_sales - bbsetting_sales_rep_filtering_on_post_pipeline_for_all_or_self
This last option is handy in teams where all users need to be able to access all Sales Orders, but should not be able to filter/total the sales of another user.
Sunday, July 5, 2015
Grid2CSV DOM DIV Grid to CSV exporter
For BlueBox coders, a new CSV conversion tool for CSS DIV grids.
This BlueBox function creates the 'excel/csv' icon as a link to a Javascript csv emulator - redirecting to a downloadable CSV file.
The key elements are to include the class-name 'csvrow' in all your row wrapper DIV elements, and the class-name 'csvcell' in all your cell DIV elements.
resp("
".grid2csv('grid2csvtest')."
<div id=grid2csvtest>
<div class='bb_list_row_header csvrow'>
<div class='bb_list_cell csvcell'>1</div>
<div class='bb_list_cell csvcell'>2</div>
<div class='bb_list_cell csvcell'>3</div>
<div class='bb_list_cell csvcell'>4</div>
<div class='bb_list_cell csvcell'>5</div>
<div class='bb_list_clear'></div>
</div>
<div class='bb_list_row csvrow'>
<div class='bb_list_cell csvcell'>a1</div>
<div class='bb_list_cell csvcell'>a2</div>
<div class='bb_list_cell csvcell'>a3</div>
<div class='bb_list_cell csvcell'>a</div>
<div class='bb_list_cell csvcell'>a5</div>
<div class='bb_list_clear'></div>
</div>
<div class='bb_list_row csvrow'>
<div class='bb_list_cell csvcell'>b1</div>
<div class='bb_list_cell csvcell'>b2</div>
<div class='bb_list_cell csvcell'>b3</div>
<div class='bb_list_cell csvcell'>b4</div>
<div class='bb_list_cell csvcell'>b5</div>
<div class='bb_list_clear'></div>
</div>
<div class='bb_list_row csvrow'>
<div class='bb_list_cell csvcell'>b1</div>
<div class='bb_list_cell csvcell'>b2</div>
<div class='bb_list_cell csvcell'>b3</div>
<div class='bb_list_cell csvcell'>b4</div>
<div class='bb_list_cell csvcell'>b5</div>
<div class='bb_list_clear'></div>
</div>
</div>
");


Friday, June 26, 2015
Styling CSS Lists in BlueBox
For BlueBox coders, CSS lists can be neatly styled using some standard CSS classes:
Note the use of makeclickble() for the links.
...show the header row...
<div class=bb_list_row_header>
<div class=bb_list_cell>PO</div>
<div class=bb_list_cell>Date</div>
<div class=bb_list_cell>Item</div>
<div class=bb_list_cell_right>PurchQty</div>
<div class=bb_list_cell_right>PurchUnit</div>
<div class=bb_list_clear></div>
</div>
...then loop through your list items...
<div ".makeclickable("/?some_url","_blank")." class=bb_list_row>
<div class=bb_list_cell>$po[_id]</div>
<div class=bb_list_cell>".date("d M Y",strtotime($po[transaction_date]))."</div>
<div class=bb_list_cell>".$row[item_data][name]."</div>
<div class=bb_list_cell_right>".$row[qtyNUM]."</div>
<div class=bb_list_cell_right>".$row[unit_name]."</div>
<div class=bb_list_clear></div>
</div>
Wednesday, June 24, 2015
Redirects Module
A new BlueBox redirect module has been created to handle redirecting and
issuing of 404 Page Not Found errors when front-end web content changes
or is moved.
The module can be accessed via
Publishing -> URL Redirects. The following fields are available when
setting up a new redirect:
Url: This is a part
or the full url that needs to be redirected. It excludes the host. ie:
/?login . It can also be blank (will redirect the entire domain)
Type:
A redirect can be either Permanent, Temporary, 404 or Template. The
correct type should be chosen to indicate to any search engines how this
url should be handled. For 404 (Not Found) and Template, the Template
box can be used to display a custom message.
Redirect Url: If Permanent or Temporary type is chosen, the destination url should be set here.
Template: If Template or 404 type is chosen, a custom template can be set to display.
User Logged In: Will apply the redirect/template to only users either logged in, logged out, or both.
Order: Will prioritize redirects should multiple redirects match the same url. Only one redirect will be run.
Monday, June 22, 2015
Web Caching in BlueBox
A new front-end caching feature has been introduced into Bluebox.
This allows for mostly static, front-end content to be cached to speed
up load time and reduce overall server load.
Caching is turned on via the following config settings:
$system_cache_frontend_pages=
$system_cache_frontend_pages_
$system_cache_frontend_pages_
Setting
$system_cache_frontend_pages = 1 will trigger the system to start
caching pages as they're generated, while the period (in hours) will
determine how long a page will be cached for before being refreshed.
Front end caching will be affected by the following
1. Caching is only utilized when there's no user session (ie. logged out)
2. "Post" request methods always ignore caching (such as sending contact forms).
3. Caching can be manually ignored by adding $global['nocache']=1 to the url string
4.
Front-end template groups can be set to ignore caching by adding
them to the bb_web_cache bbsetting: bbsetting_exclude_templates
5.
Specific urls (that would otherwise be included in caching) can be
excluded from caching by setting them in bb_web_cache bbsetting:
bbsetting_exclude_urls - does partial matching
6. Any url with a "class" variable set ignores the cache
7. However,
it is possible to include urls with "class" in them by setting them in
bb_web_cache bbsetting: bbsetting_include_urls - does partial matching
The cache can be flushed manually by going to Publishing -> CMS -> Web Cache from the main LHS menu.
New Matcha/Captcha Module in BlueBox
BlueBox coders will be interested to note a new captcha/matcha module, which is configured as follows:
Basically, it uses JS to hook into an image to display the captcha (so it can be used for caching). it's called using bb_captcha::init()
e.g.
<img src="" id="matcha-img" />
<!--:class:bb_matcha:init:-->
it takes an optional "where" parameter to specifiy the img ID if different:
<img src="" id="matcha-custom-img" />
<!--:class:bb_matcha:init|matcha-custom-img:-->
the matcha is checked as normal via the $_SESSION['matcha'] value.
Thursday, June 11, 2015
Sales Monitoring Module
BlueBox now has a Sales Monitoring Module (Sales > Sales Monitor). This module is set up by adding entries to the table which define how you want to monitor the sales activity.
You can specify the sales threshold (invoice value) that should trigger en email alert, specify who should get the emails and how often they should be alerted:
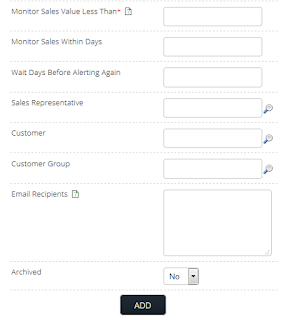
You can specify the sales threshold (invoice value) that should trigger en email alert, specify who should get the emails and how often they should be alerted:

Once you have defined your sales monitor/s, you add them to the CronJob Module and this then triggers the Sales Monitor daily/weekly etc.
Friday, June 5, 2015
BlueBox and Stripe Payment Solutions
BlueBox Business System now has a formal plugin with Stripe (www.stripe.com)


Add the Stripe Account settings via Integration > Stripe. Here you need to insert your live and test keys - found in your Stripe account. You can also set it to run in Test/Live mode either via this settings panel or as a variable passed by the pay_button function.
One of the really nice features that the Stripe API allows is easy re-use of card details via secure tokens. This makes buyer's one-click purchasing is easily implemented using this new module.
The new plugin allows development of integrated payments within BlueBox using the Stripe API - by simply adding two lines of code:
$stripe=new bb_stripe();
resp($stripe->pay_button(array(
"email"=>$_SESSION[user][email],
"ref"=>$reload_order[order_number],
"name"=>"Payment for Order $reload_order[order_number]",
"amount"=>$reload_order[order_totalCUR]*100,
"success_url"=>"/?estore&global[p]=payment&global[success]=$reload_order[_apikey]",
"failure_url"=>"/?estore&global[p]=payment&global[failure]=$reload_order[_apikey]",
)));
Thursday, May 21, 2015
3 New BlueBox PDA/Handheld Functions
BlueBox has had the addition of 3 new functions for handheld devices and PDA's.
These can be accessed via the Integration > PDA Functions module:

These functions are designed to run on a small-screen device with a built-in in-line 2D barcode scanner and will allow easy scanning of barcoded items for checking stock values, adjusting stock and receiving stock.
For the 'Receive Stock' Function there is a holding module that temprarily stores the scanned items until they are manually 'posted' into a live GRN document - this can be found in the top-menu of the 'PDA Functions' module:


Essentially this module provides access to the PDA URL which is /?pda - accessing this will launch the PDA functions:


Tuesday, May 19, 2015
Auto-adjusting Negative Stock upon GRN
When receiving stock via a GRN - Goods Received Note - in BlueBox ERP you have the option of auto-allocating the items to any Despatch Notes that have gone out within the past few hours where the stock was not available and therefore the items were marked as negative stock.
This effectively rectifies any stock that was shipped urgently before it could be recorded as received - and only happens when using the ePOS (Point of Sale) module which allows this to happen.
In order to enable this setting set the bbsetting as follows:
bb_procurement_goods_received_notes > bbsetting_grn_auto_adjust_negative_stock_within_x_hours
Set it to the number of hours prior to each GRN that you want to check for FNS Despatch Notes.
- ie 24 would check for any DSP's that were issued within the past 24 hours whenever a GRN is captured.
Forced Non-stock (or Negative Stock) is recorded and viewed in the Forced Non-Stock Report - this report has an indicator at the top to show if the bbsetting is activated for the system or not.
When each item is auto-corrected it's value/qty in this report is reduced to zero and a link is provided to view the source GRN that performed the auto-correction. Note: these lines still remain in the FNS report so that audit trails can be done reflecting that an item was initially maked as FNS and later auto corrected.

Wednesday, May 6, 2015
Stopping Unwanted Page Requests
Sometimes our systems get bombarded with regular illegal page requests (probably a spider with terrible coding). In these instances it is preferable to be able to block this traffic before all the page resources are loaded.
For this purpose our Errors Module has been expanded to include an option to 'intercept and block at header' option - this is configured as follows:
The 'error message' field (normally used for part of the human-readable error message generated by system errors) is now used to specify the query_string being passed in the URL that is being used.
The 'intercept and block' setting must be set to yes:
Wednesday, April 29, 2015
Cron Job Manager in BlueBox
BlueBox now includes a Cron Job Manager which is a central resource for managing any scripts you want to automate in your BlueBox System.

This will run on the first minute of every hour, so your 'minute' settings (if used) will need to be 1 in order to trigger
Alternatively, use */5 * * * * to run it every 5 minutes, and your 'minute' settings can then be 0 or 5 or 10 or 15 etc
Or */15 * * * * to run it every 15 minutes etc.
It is suggested that the cron be left to run at the first minute past every hour (ie 1 * * * *) which will result in 24 ocurrences in a day.
Each time it runs it checks the list of entries in this new module and sees if it is appropriate to run each entry. Entries can be set to run on certain days of the month, days of the week, hours in the day and minutes in the hour. (Note that if you do set the value for 'minute' then your Cron File will need to be running at that minute in order for the script to trigger - so it is recommended to leave 'minute' blank and use the Cron File setting to run only on the first minute of every hour.)
Adding a Cron Job:


The idea behind this tool is to provide a single point at which all regulary scripts are created and their activities and outputs are logged.
It can be found under Integration > Cron
In order to activate this module you will need to add the suggested line to the server's Cron File which will then trigger this engine, for example:
1 * * * * /usr/bin/wget -q -O /dev/null "http://www.sullycard.com/?class=bb_cron&method=run_cron&global[automate]=1"
This will run on the first minute of every hour, so your 'minute' settings (if used) will need to be 1 in order to trigger
Alternatively, use */5 * * * * to run it every 5 minutes, and your 'minute' settings can then be 0 or 5 or 10 or 15 etc
Or */15 * * * * to run it every 15 minutes etc.
It is suggested that the cron be left to run at the first minute past every hour (ie 1 * * * *) which will result in 24 ocurrences in a day.
Each time it runs it checks the list of entries in this new module and sees if it is appropriate to run each entry. Entries can be set to run on certain days of the month, days of the week, hours in the day and minutes in the hour. (Note that if you do set the value for 'minute' then your Cron File will need to be running at that minute in order for the script to trigger - so it is recommended to leave 'minute' blank and use the Cron File setting to run only on the first minute of every hour.)
Adding a Cron Job:
When adding an entry you will give it a name, and then select the class and function to run within the BlueBox System. You can also set various $global and $conf variables which will be passed to the system when it runs the function.
To restrict when your script runs you enter a combination of
- Day of Month (1 to 31) - if set it will only run on this day each month
- Day of Week (Mon or Tue or Mon,Thu) - if set it will only run on these days each week
- Hour (1-23) - if set it will only run at this hour each day
- Minute (1-59) - if set it will only run at this minute each hour
And to set a script to run on Thursday and Saturday afternoons at 5 past 4pm:
You can enter email recipients to get a notification each time the script is run:
Lastly, you can pause a script which will stop it running while the pause is in place.
Friday, April 24, 2015
Mandrill Settings Manager In BlueBox
In BlueBox we now have a Mandrill Settings Manager which makes entering the settings required to switch to using Mandrill.com for outgoing email much easier:

Mandrill is a transactional email engine (one-to-one emails) and is the send-engine of MailChimp.com. One things that Mandrill provides is the ability to control the 'from address' validity, which you do by editing the domain settings with your domain registrar and setting up the DKIM & SPF Settings which tells the recipient mailbox that Mandrill is allowed to deliver emails 'from that address'.
Mandrill is a transactional email engine (one-to-one emails) and is the send-engine of MailChimp.com. One things that Mandrill provides is the ability to control the 'from address' validity, which you do by editing the domain settings with your domain registrar and setting up the DKIM & SPF Settings which tells the recipient mailbox that Mandrill is allowed to deliver emails 'from that address'.
Friday, March 27, 2015
BlueBox ePOS Integration with PaymentExpress PDQ/Chip-n-pin
BlueBox ePOS integrates with 3rd party PDQ/Chip-n-pin card payment solutions on a customer-requirement basis. However, we have standard plugins developed for Verifone and PaymentExpress. In this article we will run through installation and management of the PaymentExpress solution:
To enable taking card payments with PaymentExpress your till/s must have the setting for 'ccard merchantid' and 'ccard terminalid' set to 'paymentexpress'. Remember that this setting is cached when you load up BlueBox ePOS, so if you change it you will need to re-load the till-data in your current open session to get the setting loaded on the till.
You will also need to have the PaymentExpress terminal plugged in via USB into your till PC, and the PaymentExpress PC-client software installed and running as a service/tray application on the till PC.
Finally, you will need the BlueBox Websocket application installed on the till PC. This provides a vital bridge between the browser (BlueBox ePOS) and the PaymentExpress PC-client software and PDQ terminal. This can be donwloaded here and needs to be extracted into the folder c://bluebox_websocket_server (important). Once extracted into this folder follow the readme.txt file instructions to install it as a service on the till PC.
Once the above items are in place you will be ready to test out your integration with the PaymentExpress terminal.
To see whether BlueBox ePOS has detected the PaymentExpress setting as 'enabled' you can go to 'extra' > 'system' and, if enabled, a green 'Card Terminal' button will be displayed as follows:

To test the WebSocket connection click on 'Card Terminal' and you will see the card-payment interface/widget:

If the widget is gray/disabled as shown above, click on the 'Connect' button to send an 'open' message to the PaymentExpress client sofware.

If you don't get a response (spinner just spins) then your BlueBox Websocket is probably not running or has stopped. To check this you can view the Services listing on your PC to see if it is listed as 'BlueBox_Websocket_Server' - if you don't see it there then you'll need to go through the troubleshooting steps in the readme.txt file found in the folder for the websocket. If you do see it, and you still cannot connect to the PaymentExpress client software, you may need to restart/remove and re-install it.
Once you get a 'connected' message from your widget you will know that the connection is made and the two systems are talking to eachother.

Card payments and refunds are handled once you have an active sale loaded. You can capture a card payment by simply clicking on the 'Card' button while a sale is loaded, or by clicking on the Payment button and entering an amount to pay by card.
Similarly, with refunds, you simply load a 'refund sale' into the till and then click on 'Card' or 'Payment' (as described above) to make the refund onto the card.
To enable taking card payments with PaymentExpress your till/s must have the setting for 'ccard merchantid' and 'ccard terminalid' set to 'paymentexpress'. Remember that this setting is cached when you load up BlueBox ePOS, so if you change it you will need to re-load the till-data in your current open session to get the setting loaded on the till.
You will also need to have the PaymentExpress terminal plugged in via USB into your till PC, and the PaymentExpress PC-client software installed and running as a service/tray application on the till PC.
Finally, you will need the BlueBox Websocket application installed on the till PC. This provides a vital bridge between the browser (BlueBox ePOS) and the PaymentExpress PC-client software and PDQ terminal. This can be donwloaded here and needs to be extracted into the folder c://bluebox_websocket_server (important). Once extracted into this folder follow the readme.txt file instructions to install it as a service on the till PC.
Once the above items are in place you will be ready to test out your integration with the PaymentExpress terminal.
To see whether BlueBox ePOS has detected the PaymentExpress setting as 'enabled' you can go to 'extra' > 'system' and, if enabled, a green 'Card Terminal' button will be displayed as follows:
To test the WebSocket connection click on 'Card Terminal' and you will see the card-payment interface/widget:
If the widget is gray/disabled as shown above, click on the 'Connect' button to send an 'open' message to the PaymentExpress client sofware.
If you don't get a response (spinner just spins) then your BlueBox Websocket is probably not running or has stopped. To check this you can view the Services listing on your PC to see if it is listed as 'BlueBox_Websocket_Server' - if you don't see it there then you'll need to go through the troubleshooting steps in the readme.txt file found in the folder for the websocket. If you do see it, and you still cannot connect to the PaymentExpress client software, you may need to restart/remove and re-install it.
Once you get a 'connected' message from your widget you will know that the connection is made and the two systems are talking to eachother.
Card payments and refunds are handled once you have an active sale loaded. You can capture a card payment by simply clicking on the 'Card' button while a sale is loaded, or by clicking on the Payment button and entering an amount to pay by card.
Similarly, with refunds, you simply load a 'refund sale' into the till and then click on 'Card' or 'Payment' (as described above) to make the refund onto the card.
Tuesday, March 24, 2015
Offline Data Management in BlueBox ePOS
BlueBox ePOS stores data offline to speed up sale processing and allow operating in non-connected times of the day.
Here is an overview of the process:
Here is an overview of the process:
- BlueBox ePOS is a web-page which uses Javascript and an offline flat-file database to process sales without interacting with the server.
- When the ePOS page is loaded by FireFox, it checks for an offline flat-file database and if not found, tries to create a blank database.
- It then connects with the server (through a series of page refreshes) and establishes which till it is representing and which till-session it is currently running.
- If it does not find an open session it will challenge the user for an opening float and open up a new session by redirecting back to the server.
- Once a session is found and a blank offline database is created it will then start downloading the category and product info from the server and storing this offline. This is done in the background in 'pages' of 500 products and can be seen in the bottom right hand corner of the screen. (An optional optimisation setting restricts the number of products downloaded to only include the commonly sold items).
- If, while the product catalogue is downloading, a product is scanned or requested which has not yet been downloaded, the system will fall-back to searching the server for the sku_code. This also happens during the day if a sku_code is requested which cannot be found offline, perhaps because it did not qualify as a commonly sold item etc.
- As sales are made they are stored offline first, and then immeditely added to the sync-to-server queue. The queue is 'pushed' after each sale and will attempt to send the oldest transactions first. A number indicating the number of un-synced transactions is displayed just above the num/key-pad on the screen.
- If an error occurs while syncing the queue a small red counter will display just above the num/key-pad on the screen. The queue should automatically keep itself syncronised, but if for some reason ( ie data corruption of a sale etc) it gets blocked then there is a manual 'force sync' setting in the 'Sales History' section of the menu.
Tuesday, March 17, 2015
New Bluebox Tag 'item_data'
BlueBox ERP has a new tag for template development:
<!--:item_data:lookup_table|field_to_show:-->
for example
<!--:item_data:bb_inventory_stock_minimum_levels|minimum_levelNUM:-->
It can be used to call any lookup table where the key identifier fields are:
itemISbb_item_dataID
option1ISbb_item_data_options1ID
option2ISbb_item_data_options2ID
option3ISbb_item_data_options3ID
... so any table which stores item_data related information.
Monday, March 16, 2015
Generating Barcodes in BlueBox (Barcode Tag Generator)
BlueBox ERP uses various libraries to generate barcodes. We have now added a useful barcode 'tag generator' into the system to assist in choosing the optimal settings for a specific barcode application.
To find the tag generator simply surf to /?bb_barcode in your BlueBox System:

To find the tag generator simply surf to /?bb_barcode in your BlueBox System:
Replenishment Automation in BlueBox
BlueBox ERP has had a Replenishment Module for many years, which effectively acts as a MRP tool with min/max levels and purchase order generation.
We have now added an automation function to this module which can be set to automatically order the required items from a specific supplier on a daily/weekly/monthly basis.
This new feature effectively runs the Replenishment Report and automatically orders any items which are deemed to be required at that time. It generates a Purchase Order and this can be set to be emailed to the supplier in PDF format and also with an attached CSV output file of the items required in an importable format for the supplier.
Linking Items to the Supplier:
This function relies on the items in the system being attached directly to the supplier, either via the 'default supplier' field in the Item Data entry, or via the 'Associated Item Category' in the Supplier User File.


Once you have added an Automation Entry you can view it by clicking on 'Automation' in the top-menu of the Replenishment Report.

Entries are listed showing their last run-time:

You can run entries manually by clicking on the button provided or add the script to your server's cronjob queue as specified.
If you click on an Automation Script to view it you will be able to see the history of logged run-scripts that have been stored against it:

We have now added an automation function to this module which can be set to automatically order the required items from a specific supplier on a daily/weekly/monthly basis.
This new feature effectively runs the Replenishment Report and automatically orders any items which are deemed to be required at that time. It generates a Purchase Order and this can be set to be emailed to the supplier in PDF format and also with an attached CSV output file of the items required in an importable format for the supplier.
Linking Items to the Supplier:
This function relies on the items in the system being attached directly to the supplier, either via the 'default supplier' field in the Item Data entry, or via the 'Associated Item Category' in the Supplier User File.
Setting Up Automation Entries:
Automation entries are added by running the filter for a 'Linked Supplier' in the Replenishment Report and switching 'Automate PO for this Supplier' on.
You have some options at this stage:
- If you 'name' the automation it means that you can 'edit' it by simply using the same name in future and over-riding the saved automation with the same name. If you leave the name option blank the Automations is named as per the Supplier Name - so any future 'blank named' automations for this supplier will over-ride this one.
- Automations will run whenever loaded, but only once per day, and optionally only on specific days of the week (ie Mon,Wed,Fri) by entering these into the specified field.
- You can choose to have an email sent to the Supplier by selecting 'send PDF' or 'send CSV', if neither of these is selected no email will be sent when the PO is created.
- The email that is generated will use the 'company procurement' details in the Supplier User File by default (ie email and name) and if these are not entered for the specific Ssupplier then the user-email and first/last names are used. This can be optionally over-ridden by entering an email and/or BCC email (comma sep. for more than one) in the fields provided.
- Note: the CSV that is produced embed the Supplier code for client company. This code is stored in the 'Cgic' field of the Supplier User Data.
Once you have added an Automation Entry you can view it by clicking on 'Automation' in the top-menu of the Replenishment Report.
Entries are listed showing their last run-time:
You can run entries manually by clicking on the button provided or add the script to your server's cronjob queue as specified.
If you click on an Automation Script to view it you will be able to see the history of logged run-scripts that have been stored against it:
Saturday, February 28, 2015
Printing Product/Price/Barcode Labels with BlueBox
BlueBox has a nifty Product/Price/Barcode label printing and new Label Template management module.
Find this module on the Inventory Dashboard:

Firstly we'll look at creating and managing Label Templates:

You can add as many templates as you require.

When adding a label template follow these guidelines:
Now that you have a template there are 2 scenarios for printing labels:
Printing Labels for Stock/Items:
Find this module on the Inventory Dashboard:
Firstly we'll look at creating and managing Label Templates:
You can add as many templates as you require.
When adding a label template follow these guidelines:
- The template should be created using CSS with metric sizing (ie mm).

- Remember that padding on DIV boxes increases the overall size of the box, so rather nest embedded DIVs if you want to add padding to an exact-sized external DIV.
- Image links should include the full URL (ie from HTTP://)
- You can add template-specific settings which will over-ride the label printing parameters:

Now that you have a template there are 2 scenarios for printing labels:
- Printing labels for stock/items from inventory or item-data
You'd use this method to print price-labels, barcode-labels, shelf-labels etc - Printing labels from the items listed on a document
You'd use this method to print labels for goods received or goods despatched normally.
Printing Labels for Stock/Items:
- Use the filter to select the item/s you want to print labels for:

- View the list and apply the settings you require for your labels (if they have not already been applied by the template if you selected one in the previous filter):

- View, print or send to PDF as required.
- You can print labels directly from the document view:

- Or you can search for the required document by using the filter:


- Once you have selected the document or clicked directly through from the button in the document view, you will see a list of all the items on the document. Apply the settings you require for your labels (if they have not already been applied by the template if you selected one in the previous filter).

- View, print or send to PDF as required.
- You can specify within each item what it's default label template is, and this template will be used whenever the label engine is run and no specific template is selected:

- You can also toggle an item as 'requires label reprint' (as per screenshot above) and if this is set to yes the item will be listed when the filter for 'Print Labels for Stock/Items' is set:

- Once the label print-run has been sent then all the 'yes' flags on these items will automatically be set back to 'no'.
Thursday, February 26, 2015
New Debug Error Logging Module
A new debug error logging option has been added to BlueBox. This will help track down and replicate issues on live systems.
To
turn on, the "debug_log_errors_to_file" variable should be set to 1 in
the conf file. The system will then begin logging all errors to
/engine/logs/errors.html
Monday, February 23, 2015
Price Embedded Barcodes in BlueBox ePOS
Newly added to our BlueBox ePOS Module is the ability to read price embedded barcodes.
This feature is added as a plugin, and can be configured to read as many different styles of price embedded barcodes as required.
The normal standard for price embedded barcodes is to embed a EAN barcode (13 digits including checksums) with a product barcode (or sku_code) and price. The purpose for these barcodes is to allow for dynamic pricing at point of sale, embedded in a quickly scannable barcode.
The syntax for the barcode is normally something along the lines of:
TTBBBBCPPPPPC (eg 2000017000336)
where TT is the trigger number for the price-embedded barcode (eg 20) and
BBBB is a 4 digit barcode (or sku_code) (eg 0001) and
C is a checksum digit (ignored) and
PPPPP is a 5 digit price in cents (eg 00033 = 0.33)
To add plugin to BlueBox ePOS simply add as many plugin statements as required for the number of price embedded barcode styles you require eg:
{price_embedded_barcode|string_length|prefix|sku_start_pos|sku_end_pos|price_start_pos|price_end_pos|conversion_ratio}
becomes
{price_embedded_barcode|13|20|3|6|8|12|1000}
These can be repeated next to eachother in the plugins areas, as required, eg:
{price_embedded_barcode|13|20|3|6|8|12|1000}{price_embedded_barcode|13|27|3|6|8|12|0}
Tuesday, February 17, 2015
var $bbsetting_formbuilder_fields=array("field","field");
and
var $bbsetting_formbuilder_fields_settings=array("field"=>value,"field"=>value);
Subscribe to:
Posts (Atom)