A simple integration in BlueBox ERP allows you to embed Google re-Captcha form protection into your BlueBox forms.
Once you have registered your new re-Captcha with Google, you can use your public and secret keys as follows:
if(bb_recaptcha_verify::verify("my-secret-goes-here")){
//re-captcha was ticked
}else{
//re-captcha failed
}
The form needs to have the following added to it at the place where the re-Captcha tickbox needs to appear:
<script src='https://www.google.com/recaptcha/api.js'></script>
<div class=\"g-recaptcha\" data-sitekey=\"your-public-key-goes-here\"></div>
Thursday, October 6, 2016


Monday, September 26, 2016
Making Fields Required with FormBuilder
A new feature in the BlueBox ERP platform Formbuilder is the ability to mark certain fields as required:
- Go to Admin > Modules > Form Builder
- Select the form you want to edit or add a new form
- Hover over the field you want to mark as 'required' - and click the green R to toggle this setting

- Fields are marked in red if they are globally required (ie via the bbsetting) and in purple if they are only required via this Formbuilder setting


Wednesday, June 29, 2016
Item Inactivity Report
BlueBox ERP now includes an Item Inactivity Report which allows you to filter out items that have been inactive during a set period, and mark them as discontinued.
Inactivity in this context relates to the item being used on a debtors invoice or a purchase order during the period.
Carious filters allow you to narrow down your selection and there is an automated switch to bulk-set items listed to discontinued on/off.
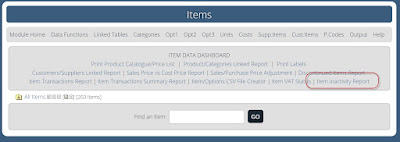
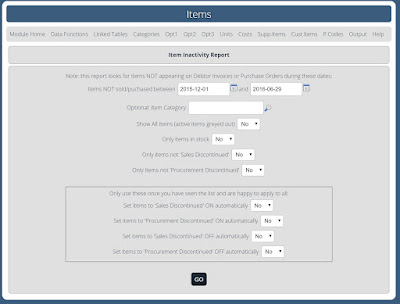
Inactivity in this context relates to the item being used on a debtors invoice or a purchase order during the period.
Carious filters allow you to narrow down your selection and there is an automated switch to bulk-set items listed to discontinued on/off.


Monday, June 27, 2016
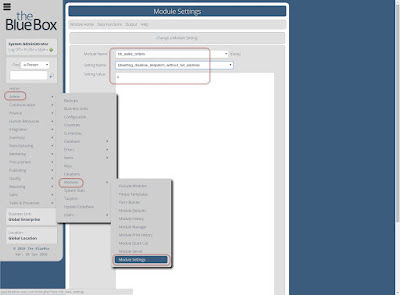
Disallow Despatch Without Address
BlueBox ERP has a new setting which stops despatches from happening when a customer account has no valid address on file:

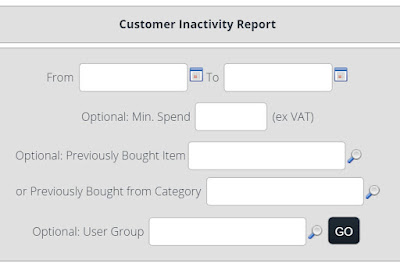
Customer Inactivity Report
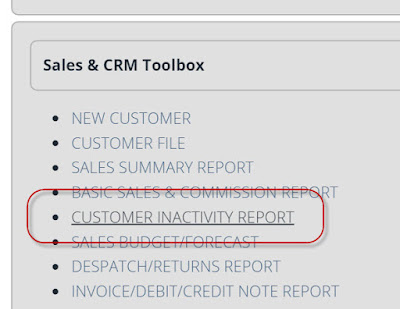
BlueBox ERP now includes a Customer Inactivity Report which allows you to identify customers who have not purchased within a given period. Filters include the ability to select from within a certain customer group, for purchases of a certain item or for purchases within a certain item category.


Item Cost Price Alerts - Now on Financial Forms
BlueBox ERP now includes item cost price alerts in Financial Forms.
The new pop-out alert can be seen when an item is added to a Sales Order, Despatch Note or Debtors Invoice.
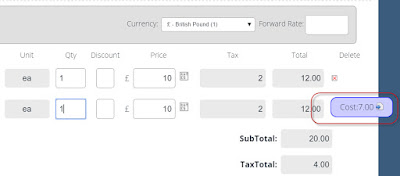
The new pop-out alert can be seen when an item is added to a Sales Order, Despatch Note or Debtors Invoice.

Thursday, June 2, 2016
New Sales Reporting Feature for BlueBox
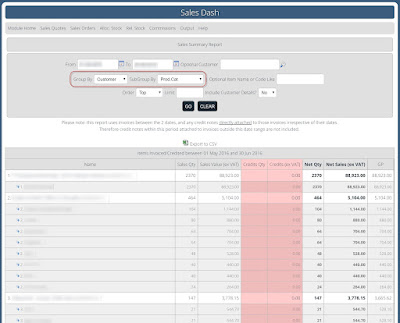
Sales reporting for BlueBox has had an upgrade in that the Sales Summary Report now includes a powerful sub-group function.
The two main sales reports are the Sales Summary Report (which has had this new feature added to it) and the Basic Sales and Commission Report.
In the Sales Summary Report it is now possible to Group and Sub-group your sales data using numerous options including customer, item, item/option, sales rep, customer service rep, day, week, month, business unit, product category and business unit. Each of these is also available as a sub-group option.
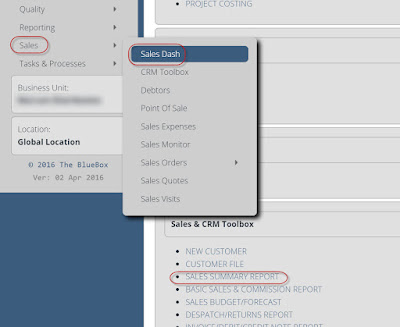
The two main sales reports are the Sales Summary Report (which has had this new feature added to it) and the Basic Sales and Commission Report.
In the Sales Summary Report it is now possible to Group and Sub-group your sales data using numerous options including customer, item, item/option, sales rep, customer service rep, day, week, month, business unit, product category and business unit. Each of these is also available as a sub-group option.


Tuesday, March 8, 2016
Authorizations within BlueBox Business Systems
The Authorization Module in BlueBox (Finance > Authorizations) recently had an upgrade which allows for the tracking and approval of user-group assignments (ie if a user is being linked to the group Creditors and therefore being made a 'supplier' in the system, for example).

Initially the Authorization Module was developed to control the addition of financial documents in the system - and in the Authorization Control settings you will notice various fields pertaining to findoc characteristics - ie value, on-hold status, if supplier or if customer in group etc.
As data is added to the system, these controls are checked and if found to apply to a certain document would trigger the authorization process. Emails are sent automatically to the selected signatories and these need to digitally sign and approve/reject the request. A fully approved request is then emailed back to the logger and they have the option to then go and 'finalize' the original document now that it is approved. (See below for a new feature where this finalization can now be automated.)
The most obvious application of the new user-group assignment control is for the approval of Suppliers or Customers into your BlueBox system. When a new user is added to the system an entry is added to bb_users and a corresponding entry is made into bb_users_groups_link. Is this this latter table that is monitored by the Authorizations module - and when a user is being linked to the selected User Group (or a sub-group of it) - then the Authorization process kicks in.
How Authorizations work in BlueBox:

Initially the Authorization Module was developed to control the addition of financial documents in the system - and in the Authorization Control settings you will notice various fields pertaining to findoc characteristics - ie value, on-hold status, if supplier or if customer in group etc.
As data is added to the system, these controls are checked and if found to apply to a certain document would trigger the authorization process. Emails are sent automatically to the selected signatories and these need to digitally sign and approve/reject the request. A fully approved request is then emailed back to the logger and they have the option to then go and 'finalize' the original document now that it is approved. (See below for a new feature where this finalization can now be automated.)
The most obvious application of the new user-group assignment control is for the approval of Suppliers or Customers into your BlueBox system. When a new user is added to the system an entry is added to bb_users and a corresponding entry is made into bb_users_groups_link. Is this this latter table that is monitored by the Authorizations module - and when a user is being linked to the selected User Group (or a sub-group of it) - then the Authorization process kicks in.
How Authorizations work in BlueBox:
- Firstly the administrator will add a new Authorization Control. In the case of a 'Supplier check' the Authorization Control would be for the module bb_users_groups_link. As part of refining the specific user group that is affected by the control - the administrator can then select from either the 'if supplier category' or 'if customer category' - this restricts to only control if the group that the user is being added to is within the down line scope of the selected category.
- A new feature is the option to 'auto finalize after approval' - previously, and still by default if this option is not selected, the finally authorized data would need to be 'finalized' manually via the Authorization Module Dashboard once all signatories had digitally signed the request.
- Once the Control is in place it can be monitored on the Authorization Dashboard. As documents or new data entries are added they will trigger email requests for authorization to the various signatories and they will then log in and digitally sign to approve/reject the requests.
Wednesday, August 26, 2015
BlueBox Location Types
BlueBox ERP has a number of types which can be applied to any location:
Finished Goods Node: Defaults the "Finish At" location to the nearest Finished Goods node on works orders. Used as a pack to location when adding stock (GRN/WO Builds) if none set and the item has no default stock location. Also used as the default "From Location" on bb_sales_point_of_sale_tillslips and bb_sales_orders when allocating stock if there's no from/despatch location already set.
Despatch Node: Defaults the "Despatch From" to the nearest Despatch Node on sales orders.
Jobbing Node: Defaults the "Return To" location on inventory returns
Non Sales Node: Stops users from creating Sales documents within flagged locations. Also stops users from selecting flagged locations from within sales modules (ie. any To/From location selections) [NOTE: This is a recent change. before it blocked all non-sales locations on all docs]. Finally, it will also exclude flagged locations when checking for available stock when the To Document is not bb_manufacturing_works_orders/bb_inventory_pick_pack_slips (so applies to all other documents).
Non Transfer In Node: The "Deliver To" location cannot be a non-transfer in node on GRNs. It also excludes/blocks non-transfer in nodes in the "To Location" on Internal Transfer Notes/Pick Pack Slips.
Isolation Node: Stops these locations from being used as the source in auto-allocation of stock. However, it will not block stock requests if the primary from location is an isolation node (allowing stock to be manually moved into and out of isolation areas).
Exclude From Pick Slips: Stops these locations from being used in the "From Location" when generating a pick slip.
Write Off Node: Stock transfered into locations with this flag are automatically set to the Written Off status.
Finished Goods Node: Defaults the "Finish At" location to the nearest Finished Goods node on works orders. Used as a pack to location when adding stock (GRN/WO Builds) if none set and the item has no default stock location. Also used as the default "From Location" on bb_sales_point_of_sale_tillslips and bb_sales_orders when allocating stock if there's no from/despatch location already set.
Despatch Node: Defaults the "Despatch From" to the nearest Despatch Node on sales orders.
Jobbing Node: Defaults the "Return To" location on inventory returns
Non Sales Node: Stops users from creating Sales documents within flagged locations. Also stops users from selecting flagged locations from within sales modules (ie. any To/From location selections) [NOTE: This is a recent change. before it blocked all non-sales locations on all docs]. Finally, it will also exclude flagged locations when checking for available stock when the To Document is not bb_manufacturing_works_orders/bb_inventory_pick_pack_slips (so applies to all other documents).
Non Transfer In Node: The "Deliver To" location cannot be a non-transfer in node on GRNs. It also excludes/blocks non-transfer in nodes in the "To Location" on Internal Transfer Notes/Pick Pack Slips.
Isolation Node: Stops these locations from being used as the source in auto-allocation of stock. However, it will not block stock requests if the primary from location is an isolation node (allowing stock to be manually moved into and out of isolation areas).
Exclude From Pick Slips: Stops these locations from being used in the "From Location" when generating a pick slip.
Write Off Node: Stock transfered into locations with this flag are automatically set to the Written Off status.
Wednesday, July 8, 2015
Sales Rep Filtering in Sales Orders and Quotes
BlueBox offers filtering restrictions for Sales Representatives/users in the system.
A Sales Rep. is assigned to a Sales Order or Quote automatically based on the user who creates the document. This can be set manually too, at the time of creation or on editing the document.
There are 3 main status types when it comes to restricting who can see Sales Orders or Quotes assigned to other Sales Reps:
A Sales Rep. is assigned to a Sales Order or Quote automatically based on the user who creates the document. This can be set manually too, at the time of creation or on editing the document.
There are 3 main status types when it comes to restricting who can see Sales Orders or Quotes assigned to other Sales Reps:
- If the user has 'admin' permissions for bb_sales_orders or bb_sales_quotes then they will be abloe to see (and filter) by all sales reps. There is also a bbsetting which allows this ability to be assigned no matter what the permissions of the user are:
bb_sales - bbsetting_skip_sales_rep_filtering_on_pre_pipeline or
bb_sales - bbsetting_skip_sales_rep_filtering_on_post_pipeline - If the user is not an 'admin' user for the module, then, by default the user will only be able to see their documents (ie where their user is set as the Sales Rep.)
- Lastly, there is a setting which allows users to filter by their user for Sales Rep only - but can also search all Sales Orders by the other filter fields which are available:
bb_sales - bbsetting_sales_rep_filtering_on_pre_pipeline_for_all_or_self or
bb_sales - bbsetting_sales_rep_filtering_on_post_pipeline_for_all_or_self
This last option is handy in teams where all users need to be able to access all Sales Orders, but should not be able to filter/total the sales of another user.
Sunday, July 5, 2015
Grid2CSV DOM DIV Grid to CSV exporter
For BlueBox coders, a new CSV conversion tool for CSS DIV grids.
This BlueBox function creates the 'excel/csv' icon as a link to a Javascript csv emulator - redirecting to a downloadable CSV file.
The key elements are to include the class-name 'csvrow' in all your row wrapper DIV elements, and the class-name 'csvcell' in all your cell DIV elements.
resp("
".grid2csv('grid2csvtest')."
<div id=grid2csvtest>
<div class='bb_list_row_header csvrow'>
<div class='bb_list_cell csvcell'>1</div>
<div class='bb_list_cell csvcell'>2</div>
<div class='bb_list_cell csvcell'>3</div>
<div class='bb_list_cell csvcell'>4</div>
<div class='bb_list_cell csvcell'>5</div>
<div class='bb_list_clear'></div>
</div>
<div class='bb_list_row csvrow'>
<div class='bb_list_cell csvcell'>a1</div>
<div class='bb_list_cell csvcell'>a2</div>
<div class='bb_list_cell csvcell'>a3</div>
<div class='bb_list_cell csvcell'>a</div>
<div class='bb_list_cell csvcell'>a5</div>
<div class='bb_list_clear'></div>
</div>
<div class='bb_list_row csvrow'>
<div class='bb_list_cell csvcell'>b1</div>
<div class='bb_list_cell csvcell'>b2</div>
<div class='bb_list_cell csvcell'>b3</div>
<div class='bb_list_cell csvcell'>b4</div>
<div class='bb_list_cell csvcell'>b5</div>
<div class='bb_list_clear'></div>
</div>
<div class='bb_list_row csvrow'>
<div class='bb_list_cell csvcell'>b1</div>
<div class='bb_list_cell csvcell'>b2</div>
<div class='bb_list_cell csvcell'>b3</div>
<div class='bb_list_cell csvcell'>b4</div>
<div class='bb_list_cell csvcell'>b5</div>
<div class='bb_list_clear'></div>
</div>
</div>
");


This BlueBox function creates the 'excel/csv' icon as a link to a Javascript csv emulator - redirecting to a downloadable CSV file.
The key elements are to include the class-name 'csvrow' in all your row wrapper DIV elements, and the class-name 'csvcell' in all your cell DIV elements.
resp("
".grid2csv('grid2csvtest')."
<div id=grid2csvtest>
<div class='bb_list_row_header csvrow'>
<div class='bb_list_cell csvcell'>1</div>
<div class='bb_list_cell csvcell'>2</div>
<div class='bb_list_cell csvcell'>3</div>
<div class='bb_list_cell csvcell'>4</div>
<div class='bb_list_cell csvcell'>5</div>
<div class='bb_list_clear'></div>
</div>
<div class='bb_list_row csvrow'>
<div class='bb_list_cell csvcell'>a1</div>
<div class='bb_list_cell csvcell'>a2</div>
<div class='bb_list_cell csvcell'>a3</div>
<div class='bb_list_cell csvcell'>a</div>
<div class='bb_list_cell csvcell'>a5</div>
<div class='bb_list_clear'></div>
</div>
<div class='bb_list_row csvrow'>
<div class='bb_list_cell csvcell'>b1</div>
<div class='bb_list_cell csvcell'>b2</div>
<div class='bb_list_cell csvcell'>b3</div>
<div class='bb_list_cell csvcell'>b4</div>
<div class='bb_list_cell csvcell'>b5</div>
<div class='bb_list_clear'></div>
</div>
<div class='bb_list_row csvrow'>
<div class='bb_list_cell csvcell'>b1</div>
<div class='bb_list_cell csvcell'>b2</div>
<div class='bb_list_cell csvcell'>b3</div>
<div class='bb_list_cell csvcell'>b4</div>
<div class='bb_list_cell csvcell'>b5</div>
<div class='bb_list_clear'></div>
</div>
</div>
");


Friday, June 26, 2015
Styling CSS Lists in BlueBox
For BlueBox coders, CSS lists can be neatly styled using some standard CSS classes:
Note the use of makeclickble() for the links.
...show the header row...
<div class=bb_list_row_header>
<div class=bb_list_cell>PO</div>
<div class=bb_list_cell>Date</div>
<div class=bb_list_cell>Item</div>
<div class=bb_list_cell_right>PurchQty</div>
<div class=bb_list_cell_right>PurchUnit</div>
<div class=bb_list_clear></div>
</div>
...then loop through your list items...
<div ".makeclickable("/?some_url","_blank")." class=bb_list_row>
<div class=bb_list_cell>$po[_id]</div>
<div class=bb_list_cell>".date("d M Y",strtotime($po[transaction_date]))."</div>
<div class=bb_list_cell>".$row[item_data][name]."</div>
<div class=bb_list_cell_right>".$row[qtyNUM]."</div>
<div class=bb_list_cell_right>".$row[unit_name]."</div>
<div class=bb_list_clear></div>
</div>
Note the use of makeclickble() for the links.
...show the header row...
<div class=bb_list_row_header>
<div class=bb_list_cell>PO</div>
<div class=bb_list_cell>Date</div>
<div class=bb_list_cell>Item</div>
<div class=bb_list_cell_right>PurchQty</div>
<div class=bb_list_cell_right>PurchUnit</div>
<div class=bb_list_clear></div>
</div>
...then loop through your list items...
<div ".makeclickable("/?some_url","_blank")." class=bb_list_row>
<div class=bb_list_cell>$po[_id]</div>
<div class=bb_list_cell>".date("d M Y",strtotime($po[transaction_date]))."</div>
<div class=bb_list_cell>".$row[item_data][name]."</div>
<div class=bb_list_cell_right>".$row[qtyNUM]."</div>
<div class=bb_list_cell_right>".$row[unit_name]."</div>
<div class=bb_list_clear></div>
</div>
Wednesday, June 24, 2015
Redirects Module
A new BlueBox redirect module has been created to handle redirecting and
issuing of 404 Page Not Found errors when front-end web content changes
or is moved.
The module can be accessed via
Publishing -> URL Redirects. The following fields are available when
setting up a new redirect:
Url: This is a part
or the full url that needs to be redirected. It excludes the host. ie:
/?login . It can also be blank (will redirect the entire domain)
Type:
A redirect can be either Permanent, Temporary, 404 or Template. The
correct type should be chosen to indicate to any search engines how this
url should be handled. For 404 (Not Found) and Template, the Template
box can be used to display a custom message.
Redirect Url: If Permanent or Temporary type is chosen, the destination url should be set here.
Template: If Template or 404 type is chosen, a custom template can be set to display.
User Logged In: Will apply the redirect/template to only users either logged in, logged out, or both.
Order: Will prioritize redirects should multiple redirects match the same url. Only one redirect will be run.
Monday, June 22, 2015
Web Caching in BlueBox
A new front-end caching feature has been introduced into Bluebox.
This allows for mostly static, front-end content to be cached to speed
up load time and reduce overall server load.
Caching is turned on via the following config settings:
$system_cache_frontend_pages=
$system_cache_frontend_pages_
$system_cache_frontend_pages_
Setting
$system_cache_frontend_pages = 1 will trigger the system to start
caching pages as they're generated, while the period (in hours) will
determine how long a page will be cached for before being refreshed.
Front end caching will be affected by the following
1. Caching is only utilized when there's no user session (ie. logged out)
2. "Post" request methods always ignore caching (such as sending contact forms).
3. Caching can be manually ignored by adding $global['nocache']=1 to the url string
4.
Front-end template groups can be set to ignore caching by adding
them to the bb_web_cache bbsetting: bbsetting_exclude_templates
5.
Specific urls (that would otherwise be included in caching) can be
excluded from caching by setting them in bb_web_cache bbsetting:
bbsetting_exclude_urls - does partial matching
6. Any url with a "class" variable set ignores the cache
7. However,
it is possible to include urls with "class" in them by setting them in
bb_web_cache bbsetting: bbsetting_include_urls - does partial matching
The cache can be flushed manually by going to Publishing -> CMS -> Web Cache from the main LHS menu.
New Matcha/Captcha Module in BlueBox
BlueBox coders will be interested to note a new captcha/matcha module, which is configured as follows:
Basically, it uses JS to hook into an image to display the captcha (so it can be used for caching). it's called using bb_captcha::init()
e.g.
<img src="" id="matcha-img" />
<!--:class:bb_matcha:init:-->
it takes an optional "where" parameter to specifiy the img ID if different:
<img src="" id="matcha-custom-img" />
<!--:class:bb_matcha:init|matcha-custom-img:-->
the matcha is checked as normal via the $_SESSION['matcha'] value.
Basically, it uses JS to hook into an image to display the captcha (so it can be used for caching). it's called using bb_captcha::init()
e.g.
<img src="" id="matcha-img" />
<!--:class:bb_matcha:init:-->
it takes an optional "where" parameter to specifiy the img ID if different:
<img src="" id="matcha-custom-img" />
<!--:class:bb_matcha:init|matcha-custom-img:-->
the matcha is checked as normal via the $_SESSION['matcha'] value.
Thursday, June 11, 2015
Sales Monitoring Module
BlueBox now has a Sales Monitoring Module (Sales > Sales Monitor). This module is set up by adding entries to the table which define how you want to monitor the sales activity.
You can specify the sales threshold (invoice value) that should trigger en email alert, specify who should get the emails and how often they should be alerted:
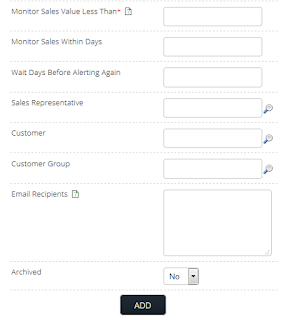
You can specify the sales threshold (invoice value) that should trigger en email alert, specify who should get the emails and how often they should be alerted:

Once you have defined your sales monitor/s, you add them to the CronJob Module and this then triggers the Sales Monitor daily/weekly etc.
Friday, June 5, 2015
BlueBox and Stripe Payment Solutions
BlueBox Business System now has a formal plugin with Stripe (www.stripe.com)


Add the Stripe Account settings via Integration > Stripe. Here you need to insert your live and test keys - found in your Stripe account. You can also set it to run in Test/Live mode either via this settings panel or as a variable passed by the pay_button function.
One of the really nice features that the Stripe API allows is easy re-use of card details via secure tokens. This makes buyer's one-click purchasing is easily implemented using this new module.
The new plugin allows development of integrated payments within BlueBox using the Stripe API - by simply adding two lines of code:
$stripe=new bb_stripe();
resp($stripe->pay_button(array(
"email"=>$_SESSION[user][email],
"ref"=>$reload_order[order_number],
"name"=>"Payment for Order $reload_order[order_number]",
"amount"=>$reload_order[order_totalCUR]*100,
"success_url"=>"/?estore&global[p]=payment&global[success]=$reload_order[_apikey]",
"failure_url"=>"/?estore&global[p]=payment&global[failure]=$reload_order[_apikey]",
)));
Thursday, May 21, 2015
3 New BlueBox PDA/Handheld Functions
BlueBox has had the addition of 3 new functions for handheld devices and PDA's.
These can be accessed via the Integration > PDA Functions module:

These functions are designed to run on a small-screen device with a built-in in-line 2D barcode scanner and will allow easy scanning of barcoded items for checking stock values, adjusting stock and receiving stock.
For the 'Receive Stock' Function there is a holding module that temprarily stores the scanned items until they are manually 'posted' into a live GRN document - this can be found in the top-menu of the 'PDA Functions' module:


Essentially this module provides access to the PDA URL which is /?pda - accessing this will launch the PDA functions:


These can be accessed via the Integration > PDA Functions module:

These functions are designed to run on a small-screen device with a built-in in-line 2D barcode scanner and will allow easy scanning of barcoded items for checking stock values, adjusting stock and receiving stock.
For the 'Receive Stock' Function there is a holding module that temprarily stores the scanned items until they are manually 'posted' into a live GRN document - this can be found in the top-menu of the 'PDA Functions' module:


Essentially this module provides access to the PDA URL which is /?pda - accessing this will launch the PDA functions:


Tuesday, May 19, 2015
Auto-adjusting Negative Stock upon GRN
When receiving stock via a GRN - Goods Received Note - in BlueBox ERP you have the option of auto-allocating the items to any Despatch Notes that have gone out within the past few hours where the stock was not available and therefore the items were marked as negative stock.
This effectively rectifies any stock that was shipped urgently before it could be recorded as received - and only happens when using the ePOS (Point of Sale) module which allows this to happen.
In order to enable this setting set the bbsetting as follows:
bb_procurement_goods_received_notes > bbsetting_grn_auto_adjust_negative_stock_within_x_hours
Set it to the number of hours prior to each GRN that you want to check for FNS Despatch Notes.
- ie 24 would check for any DSP's that were issued within the past 24 hours whenever a GRN is captured.
Forced Non-stock (or Negative Stock) is recorded and viewed in the Forced Non-Stock Report - this report has an indicator at the top to show if the bbsetting is activated for the system or not.
When each item is auto-corrected it's value/qty in this report is reduced to zero and a link is provided to view the source GRN that performed the auto-correction. Note: these lines still remain in the FNS report so that audit trails can be done reflecting that an item was initially maked as FNS and later auto corrected.

This effectively rectifies any stock that was shipped urgently before it could be recorded as received - and only happens when using the ePOS (Point of Sale) module which allows this to happen.
In order to enable this setting set the bbsetting as follows:
bb_procurement_goods_received_notes > bbsetting_grn_auto_adjust_negative_stock_within_x_hours
Set it to the number of hours prior to each GRN that you want to check for FNS Despatch Notes.
- ie 24 would check for any DSP's that were issued within the past 24 hours whenever a GRN is captured.
Forced Non-stock (or Negative Stock) is recorded and viewed in the Forced Non-Stock Report - this report has an indicator at the top to show if the bbsetting is activated for the system or not.
When each item is auto-corrected it's value/qty in this report is reduced to zero and a link is provided to view the source GRN that performed the auto-correction. Note: these lines still remain in the FNS report so that audit trails can be done reflecting that an item was initially maked as FNS and later auto corrected.

Wednesday, May 6, 2015
Stopping Unwanted Page Requests
Sometimes our systems get bombarded with regular illegal page requests (probably a spider with terrible coding). In these instances it is preferable to be able to block this traffic before all the page resources are loaded.
For this purpose our Errors Module has been expanded to include an option to 'intercept and block at header' option - this is configured as follows:
The 'error message' field (normally used for part of the human-readable error message generated by system errors) is now used to specify the query_string being passed in the URL that is being used.
The 'intercept and block' setting must be set to yes:

For this purpose our Errors Module has been expanded to include an option to 'intercept and block at header' option - this is configured as follows:
The 'error message' field (normally used for part of the human-readable error message generated by system errors) is now used to specify the query_string being passed in the URL that is being used.
The 'intercept and block' setting must be set to yes:
Subscribe to:
Posts (Atom)